

Summer Craft Ideas for Kids
Summer is a great time for kids to get creative and really enjoy their time off from school. It’s a chance for them to use their imagination in creative ways–on their timetable. Summer crafts are a great way to get your child engaged in creating their own art at home. Here are some great ideas for summer crafts for kids!
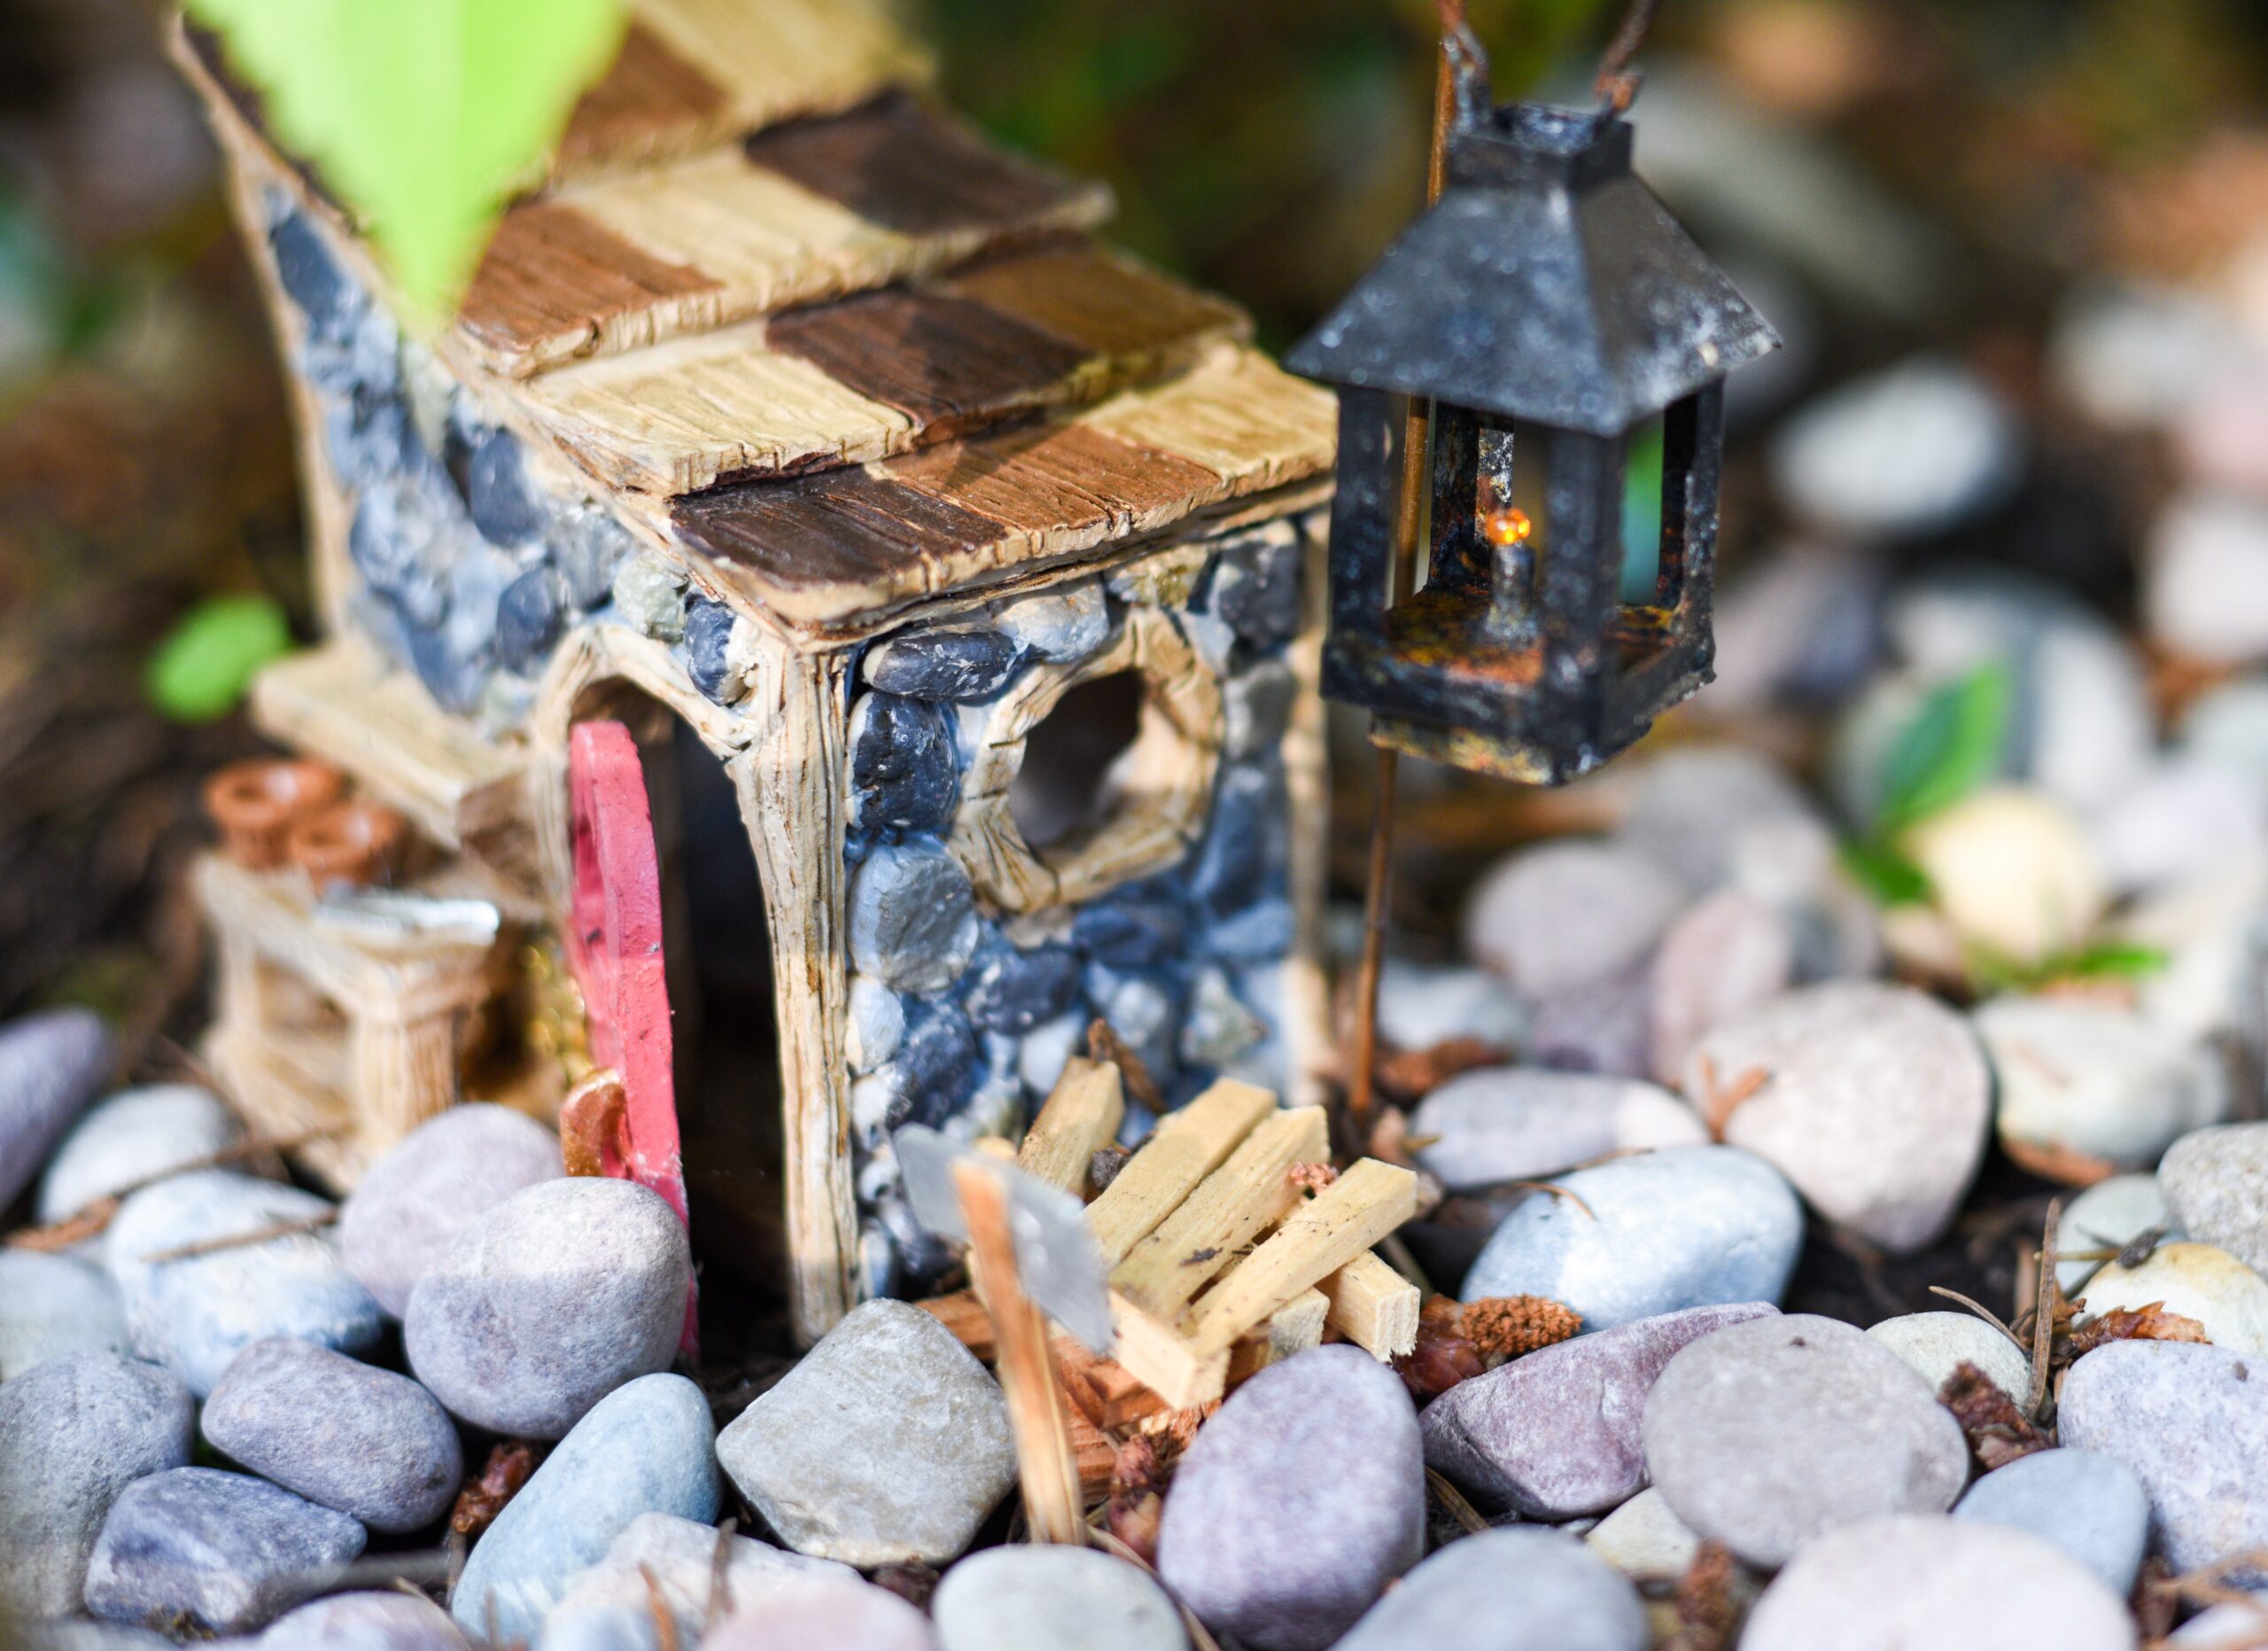
1) DIY Fairy Garden
This magical little space is similar to having a dollhouse inside. The end result is an imaginative world for your child to return to again and again for endless play. They create their own fairyland to play in!
Materials:
- Small scale plants: moss, succulents, etc.
- A container to plant your garden, or pick a space in the yard
- If you choose a container (try to find one with a hole in the bottom for water drainage)
- Dirt to fill up your container, and soil made for planting
- Find something soft for your child to put their knees on while they work
- A small garden shovel
- Pebbles and rocks
- 3-6” container for water
- Any miniature furniture you want for your fairies
- Paper and Marker
Instructions:
Once you have picked your spot for your fairy garden, make sure to have good soil and drainage. If you are using a pot, make sure it has a hole in the bottom. Have your child draw out on paper where they want the different plants to go–make a map of the new little world. Make sure to plant larger plants first, then if you have chosen to add a pond, put your 3-6” container in the dirt. This can be a coconut shell, a plastic container, a metal container–anything that inspires that magical feeling.
Once all of this is in place, cover the remaining dirt with moss leaving room where you want your stones. Place the stones, and then add some fairy furniture–benches, tables and chairs, arbors, mini-fences, or anything else your fairies need. You will need to remember to water your garden regularly–if you have used moss, make sure to put it in a place that has sun to part shade.
2) Sidewalk Chalk Paint
Making your own sidewalk chalk paint only requires a few ingredients for an afternoon of creativity!
Materials:
- ½ cup Cornstarch
- ⅔ cup water
- Food coloring
- Muffin tin
- Large paintbrushes for kids
Instructions:
Combine the water and cornstarch, until the cornstarch is fully dissolved. Then pour the mixture evenly into each section of a muffin tin. Add food coloring to each section–note that the colors will be much lighter when they are painted on the sidewalk. Head outside and add some much needed color to those sidewalks and driveways!
3) Tie-Dye Shirts/Clothes
All kids love wearing items they’ve made themselves! Here’s how to make your own Tie-dyed shirt!
Materials:
- Pre-washed, 100% cotton shirt or piece of clothing
- Rubber bands
- Rubber gloves
- 3-gallon bucket (enamel, stainless steel, or plastic if you don’t mind it getting stained)
- Glass jar with tight-sealing lid
- Large metal or enamel spoon
- Measuring spoon
- Fiber-reactive dye
- Tongs
Instructions:
To make your own dye bath, put on some rubber gloves, fill the 3 gallon bucket with 1 gallon of cool water, and fill half the glass jar with cool water. Put 2-4 teaspoons of dye powder into the jar depending on how dark you want the colors to be. Close the lid to the jar and shake it until all the dye is dissolved. Pour out the jar into the bucket and stir. If you would like to add multiple colors, repeat these steps with a different bucket for each color. Rinse your 100% cotton T-shirt in warm water, wring out the excess water, and lay it flat.
Tie your shirt with rubber bands to make different designs. There are many ways to create designs with rubber bands, so do some research beforehand to see which one your child likes the most. Place the shirt (or a specific part of the shirt according to your design) in the dye bath, stir frequently, and let it soak for 30 minutes-1 hour, depending on how deep you want your color. Use tongs to remove the shirt. With your rubber gloves on, take off the rubber bands and rinse the clothing under warm water, then gradually cooler water until the water is clear. Finish by washing your shirt alone in cold water and dry it!
4) DIY Kaleidoscope
A kaleidoscope lets your child see beautiful colors moving and changing. In this DIY project, kids get to see their own art from new angles!
Materials:
- Pringles can
- Whatever you want to decorate the outside of your kaleidoscope (paint, stickers, markers, etc.)
- Hammer and nail
- Scissors
- Cut-up pieces of tissue paper
- Glue
- Glitter
- Water
- Sponge brush
- Clear contact paper
- Strong craft glue
Instructions:
Find a Pringles can, save the lid, and decorate the outside! Once you have decorated the outside of the can, you can start to build your kaleidoscope. First, on the metal bottom of the can, use a nail and hammer to make a small hole for viewing. Next, take some small pieces of tissue paper, and use a mixture of glue/glitter/water to paste the tissue onto the outside of the plastic lid. Be careful to leave some clear space between the pieces of tissue paper.
Let this dry, and start putting pieces of tissue paper onto a similar size circle of clear contact paper. Once you have the tissue on the sticky side of the contact paper, place another piece of contact paper–sticky side to sticky side. Place your Pringles can on top of the contact paper to outline a circle–cut the circle (make sure you have quite a few pieces of tissue paper inside the circle). With strong craft glue, attach the clear “disc” contact paper circle to the open end of the Pringles can. Let it dry. Cut any rough edges, so that when you place the decorated Pringles top back on the top of the can, it can spin around, just like a Kaleidoscope!
5) Painted Rock Emojis
Painted rock emojis are a great way to create a new spin on hide and seek! Once the rocks are painted, hide them in local parks or playgrounds. Or, invite friends over to find them in your own backyard!
Materials:
- Small, unpolished white rocks (usually found at a hardware store)
- White acrylic paint
- Paint marker pens like these
- Clear multi-surface aerosol waterproofer (looks like a spray paint bottle)
To make sure all of your colors show up, first rinse your rocks and dry them thoroughly, and then paint the rocks with a white base. Now you can draw a yellow circle with your paint pen to create the outline of your emoji. You will need to let this dry, so go ahead and do this to as many rocks as you want to paint. Once the yellow is dry, you can add different emoji designs with different colors from your paint pens. Once the paint is completely dry, spray your rocks with the waterproof sealer, and go hide them for friends to find your fun designs!
6) DIY Dream Catcher
Here is an easy project that makes a beautiful piece of art!
Materials:
- Embroidery Hoop
- Pieces of colorful sheets
- A doily slightly smaller than your hoop
- Different types of ribbon lace
- Hot glue gun
Instructions:
Tear your colorful sheet into strips that can wrap around either the inner piece of the embroidery hoop or the outer piece (depending on which one fits your doily best). You will need to use a hot glue gun to keep the sheet strips in place as you wrap them around the hoop piece. Next, use extra strips of your sheet to tie the doily onto the wrapped embroidery hoop piece. Now you can tie the lace to the bottom of the hoop.
Try to tie it, so that you pull the two ends of the lace, through a loop around the hoop–this gives you two lace strands each time you tie a different piece of lace onto the hoop. Once you are done tying the lace, cut the bottoms into any design you like– straight across, a “v”, an inverted “v,” a smile-like curve. Whatever you think looks best! Hang it near your bed for a dreamy night’s sleep!
Find Affordable Supplies
We hope you have fun this summer and get to do many creative projects at home! Check out our store for art supplies. And when you’re getting ready to go back to school, we are here to help provide affordable school supplies. Our goal at Mr. Pen is to provide superior quality, and affordable products, so that you and your children can excel and create non-stop!
